While the signal chains that I use for tracks in a mix are ever changing and things are moved around, added, or changed out as needed throughout the mixing process, I do start from a common spot most of the time. This basic signal chain allows me to get static levels, solid equalization, and compress each track in a pleasing way. Here’s my basic signal chain.
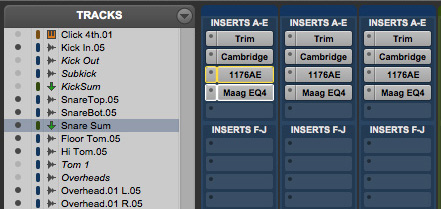
First Insert – Trim
As noted in my other posts, I tend to use the Trim plugin in Pro Tools rather than faders to achieve the basic balance of tracks and arrive at my static mix; mix before automation. This helps avoid gain staging issues later and also allows me to use the meat of the fader for automation, which allows my movements to be more precise.
Second Insert – Subtractive Equalizer
I normally use two eqs on each track and, in this spot, I’ll use an equalizer only for the reduction of frequencies; subtractive eq. I’ll use high and low pass filters in this equalizer. I’ll also target unwanted or irritating frequencies and reduce them. I do not boost anything with this equalizer. It’s important that this subtraction occurs BEFORE the compressor because it prevents spikes in unwanted frequencies from triggering the compressor. This usually results in a much smoother signal.
Third Insert – Compressor
This compressor will be my primary compressor for the track. While the exact amount of gain reduction, the ratio, attack time, and release time will vary based upon instrument and need, I typically aim for somewhere between 2 and 6 decibels of gain reduction.
Fourth Insert – Boosting Equalizer
This equalizer serves the exact opposite purpose of my first equalizer. This one is designed to boost frequencies after the compressor, which can help add some air or low end back into the track. This equalizer is usually always a different type of eq than the first one to prevent the addition of too much “character”. For example, if I used UAD’s Cambridge EQ as my subtractive EQ because of how surgical it is, I would use UAD’s Maag EQ to boost the high and low frequencies here.
From here, as sends, I’ll add reverb and delay. I’ll then automate the track. This basic signal chain, however, is my starting point usually and I find it to be very effective. On your next mix, give this signal chain a shot.

